In an era where digital presence defines business success, migrating from WooCommerce to Shopify represents a strategic pivot many companies are embracing. Shopify, known for its extensive array of features such as customizable themes, robust analytics, and an expansive app store, offers a streamlined solution for businesses looking to expand their online capabilities. What’s more, the transition to Shopify can significantly enhance a brand’s operational efficiency by simplifying ecommerce management, allowing business owners to focus more on growth and less on technical complexities.
Transitioning to Shopify from WooCommerce is not just about upgrading your ecommerce platform; it’s about realigning your business to meet the demands of an ever-evolving digital landscape. With Shopify’s diverse pricing plans and user-friendly interface, businesses of all sizes find a welcoming ecosystem to migrate to. And unless you’re a pro at working with Shopify sites, you’re probably going to want to have a helping hand that’s got experience and know how. Don’t worry, that’s where we come in. But now, back to the matter at hand: How to get your Woo site over to your spanky new Shopify site.
Preparing Your WooCommerce Store for Migration
Preparing for a migration from WooCommerce to Shopify involves a series of crucial steps to facilitate a smooth transition. It’s important to thoroughly plan each phase, ensuring that you cover everything from data backup and inventory review to understanding Shopify’s platform.
This proactive strategy helps overcome potential obstacles and paves the way for a smooth migration. It’s essential to first secure all your WooCommerce data, encompassing product specifics, customer details, and order history, to safeguard against any data loss.
Next, review and reorganize your inventory and categorization to align with Shopify’s structure, which may differ from WooCommerce. It’s wise to schedule your migration to Shopify during a period of low traffic. This strategic timing helps minimize disruptions and ensures a smoother transition for both you and your customers, allowing you to test and refine without affecting the majority of your user base.
Finally, familiarize yourself with Shopify’s features and interface or consider hiring a migration expert to help streamline the process and tackle any technical challenges efficiently.
Backup Your Data
Before diving into the technicalities of migration from WooCommerce to Shopify, safeguarding your data is crucial. First, create comprehensive backups of your entire WooCommerce store, including products, customer data, orders, and settings. Ensure these backups are stored securely, possibly in multiple locations or cloud storage services, to mitigate the risk of data loss.
- Full Store Backup: Ensure you have a complete backup of your WooCommerce store. This includes all files, databases, and configurations. Tools like UpdraftPlus or BlogVault can automate this process, providing peace of mind before making major changes.
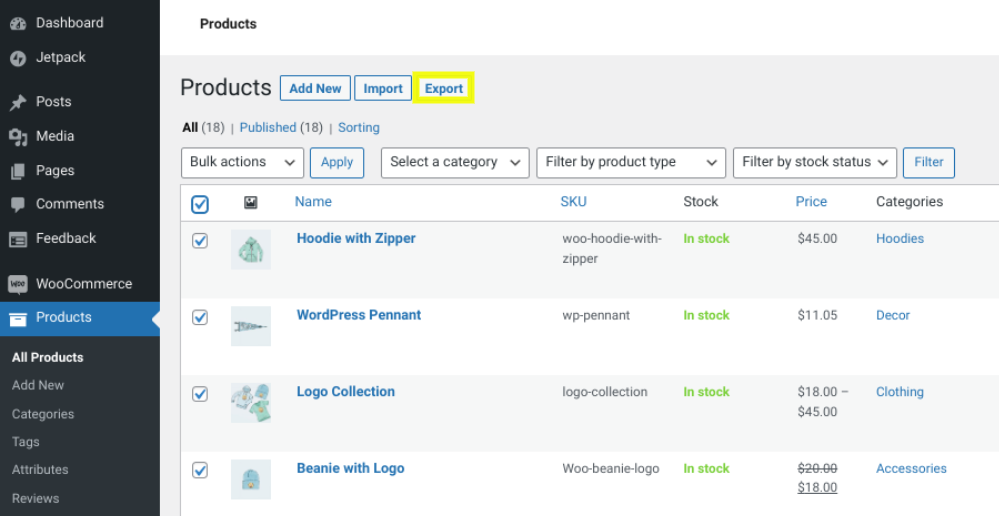
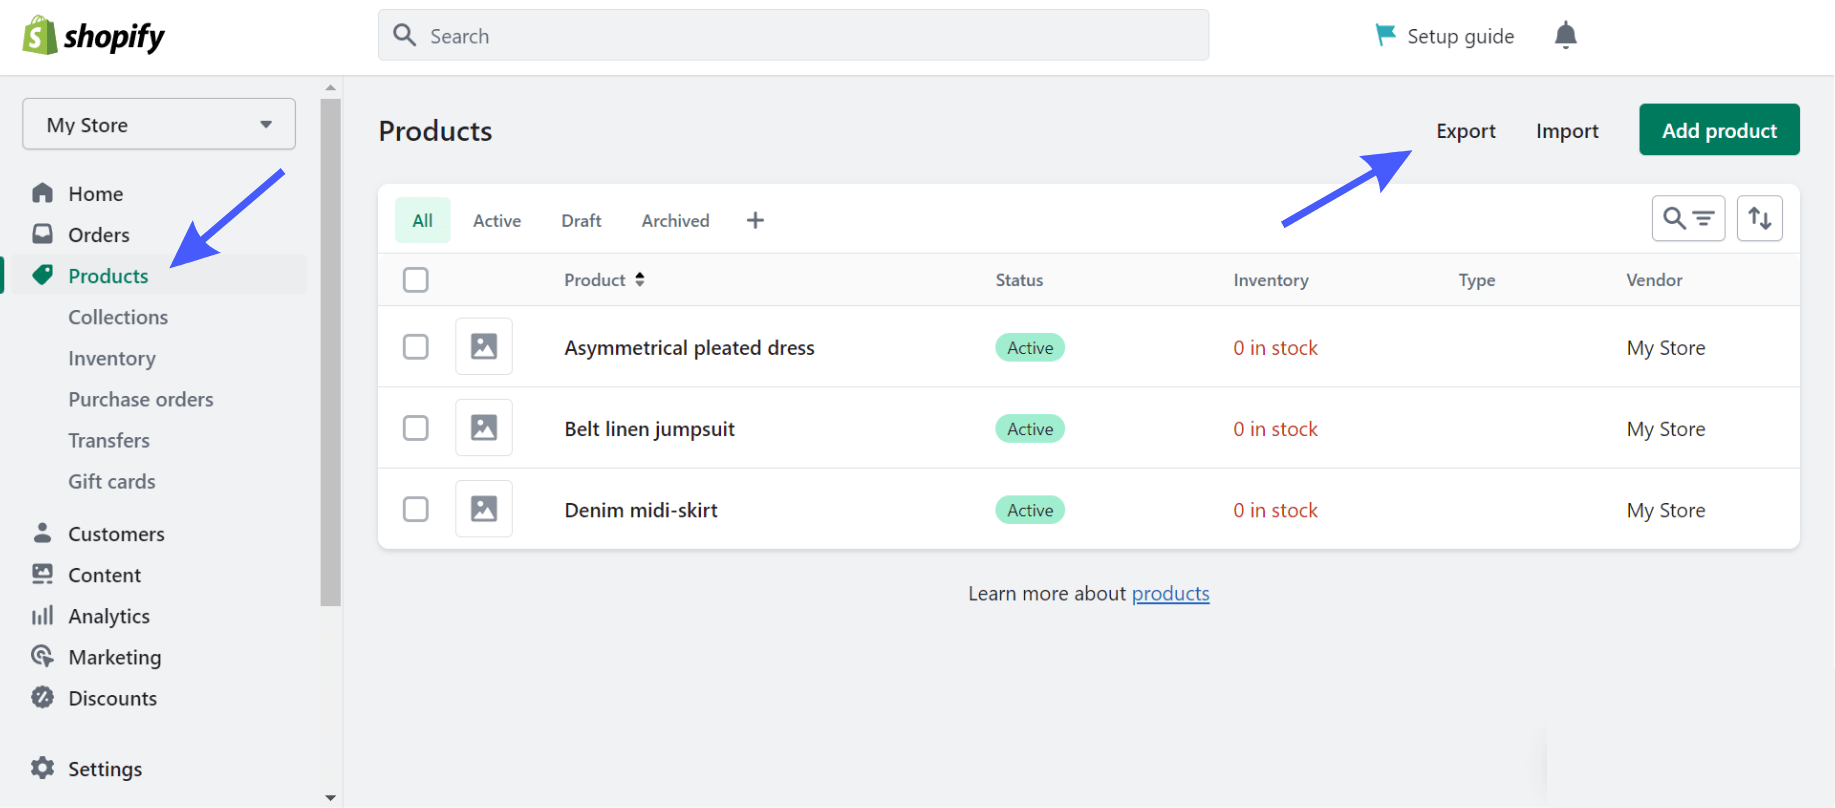
- Export Critical Data: Specifically, export all product and customer data. WooCommerce allows you to export this data in CSV format, which can be edited if necessary before importing to Shopify.
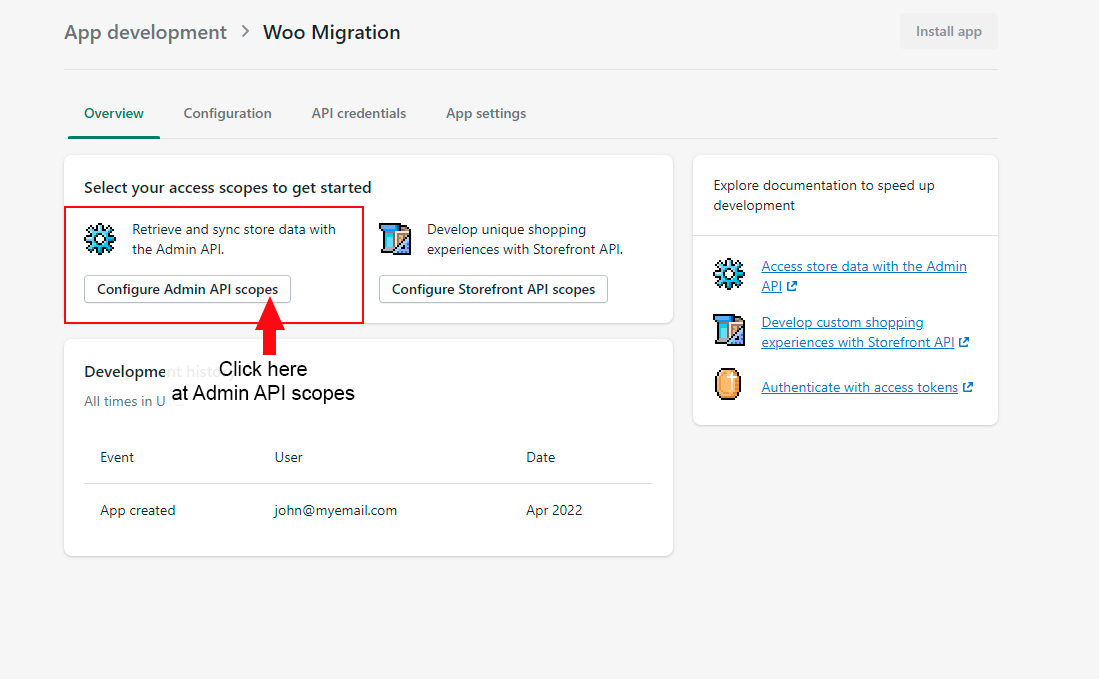
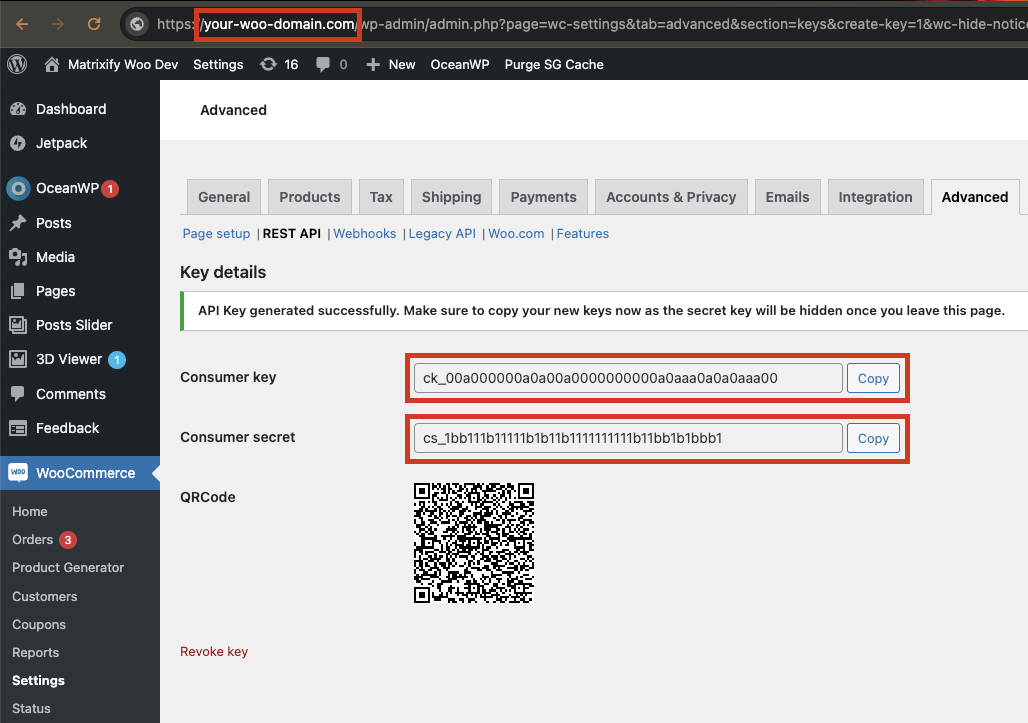
Set Up API Credentials
Generating API credentials is a foundational step in the migration process when moving from WooCommerce to Shopify. These credentials are essential for enabling secure communication between different software systems, ensuring that data transfers and integrations are both safe and reliable.
Here’s how to manage this step effectively:
- Access WooCommerce Settings: Navigate to WooCommerce -> Settings -> Advanced -> REST API in your WordPress admin area.
- Create New API Key: Click on ‘Add Key’. You’ll need to provide a description, choose a user, and set permissions. After creating the credentials, make sure to note down the Consumer Key and Consumer Secret. Recording these details is crucial for future reference and use in your integrations, ensuring you have the necessary information readily available when needed.
Prepare and Edit Data
Adjusting your data to fit Shopify’s requirements is essential for ensuring a smooth transition from WooCommerce. This process involves several key steps:
- Edit Product Data: Modify your WooCommerce export data to match Shopify’s format. Pay special attention to fields like product variants and categories.
- Customer Data Preparation: Similarly, edit your customer data files. Ensure fields like email addresses and shipping information align with Shopify’s data structure.
Utilize the Matrixify App
Matrixify (formerly Excelify) plays a pivotal role in migrating data efficiently:
- API URL Construction: Use the template https://<consumer_key>:<consumer_secret>@<server> to create your WooCommerce API URL. Replace placeholders with your actual API credentials and server information.
- Start Import Job: In Matrixify, initiate a new import job using the constructed API URL. Select the ‘Upload from URL’ option and ensure the format is set to ‘WordPress / WooCommerce API’.
- Dry Run Option: Before executing a full import, use the “Dry Run” option in Matrixify. This converts data to the Matrixify format without importing it, allowing for a review and adjustment phase.
- Upload and Review: After the dry run, download and unzip the generated file. Upload images from the ‘Images’ folder to Shopify Files. Review the ‘Import_Result Excel’ file thoroughly before final import to ensure all data appears correct.
Final Checks and Migration
Before the actual migration, double-check all elements:
- Review and Upload Final Data: Once satisfied with the data setup in Matrixify, upload the final Excel file and commence the full import process.
- Monitor and Adjust: Keep an eye on the import process. Matrixify allows you to track the job details and make necessary adjustments.
If you take notes and are following these steps carefully, you can ensure that your WooCommerce store is perfectly primed for a successful migration to Shopify. Moreover, this meticulous preparation does more than just smooth the transition; it also sets the groundwork for fully leveraging Shopify’s extensive ecommerce capabilities, enabling you to maximize the potential of your online store once you make the switch.
Setting Up Your Shopify Store
Setting up your Shopify store after migrating from WooCommerce involves several important steps to ensure a successful launch. Here’s a breakdown to guide you through the process:
Sign Up and Customize Your Shopify Store
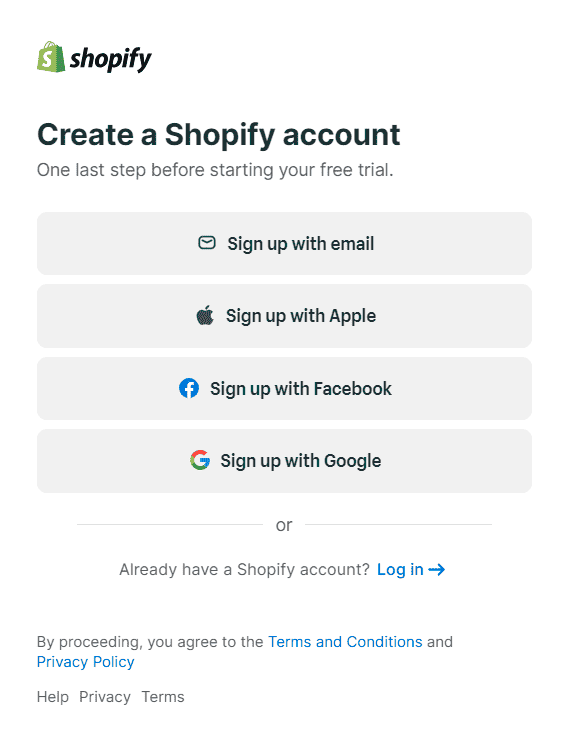
✔️Create a Shopify Account: Start by signing up for a Shopify account. Consider taking advantage of Shopify’s 14-day free trial to delve into the platform’s features without any commitment. This trial period is an excellent opportunity to familiarize yourself with the interface and discover all that Shopify has to offer, helping you make an informed decision about whether it’s the right fit for your ecommerce needs.
✔️Choose a Theme: Choose a theme that resonates with your brand’s aesthetics from Shopify’s theme store, which offers a wide selection of both free and paid themes that are not only visually appealing but also functional. Customize your chosen theme to tailor its look and feel so that it effectively embodies your brand’s identity and enhances your online presence.
✔️Add Products: Choose a theme that resonates with your brand’s aesthetics from Shopify’s theme store, which offers a wide selection of both free and paid themes that are not only visually appealing but also functional. Customize your chosen theme to tailor its look and feel so that it effectively embodies your brand’s identity and enhances your online presence.
✔️Customize Store Pages: Set up essential pages such as ‘About Us’, ‘Contact’, and ‘FAQs’. These pages are crucial as they provide visitors with information about your business and customer service.
Configure Essential Store Settings
✔️ Set Up Shipping Rates: Establish your shipping strategies and rates. Shopify enables you to fine-tune settings for both domestic and international shipping, offering customization options based on weight, price, or location. This flexibility allows you to tailor shipping strategies to meet the specific needs of your business and your customers, ensuring efficient and effective delivery solutions.
✔️ Configure Taxes: Ensure that your store complies with local tax regulations. Shopify can automatically handle most common sales tax calculations.
✔ ️ Set Up Payment Providers: Integrate various payment gateways to accept payments seamlessly on your Shopify store. Shopify accommodates a diverse array of payment methods, including credit cards, PayPal, and various local options. This versatility guarantees a seamless and hassle-free transaction process for your customers, significantly improving their overall shopping experience.
✔ ️ Domain Setup: You have the option to connect your existing domain to Shopify or purchase a new one directly through the platform. This flexibility lets you either preserve your established brand identity or create a new one with a domain that suits your business and enhances your market presence.
Optimize and Test Your Store
✔️ SEO Setup: Implement SEO best practices to enhance your store’s online visibility. This involves optimizing your product descriptions with relevant keywords, ensuring your website is mobile-friendly, and developing quality backlinks. These efforts are designed to boost your rankings in search engine results, drawing more traffic to your Shopify store and potentially increasing sales.
✔️ Place Test Orders: Before officially launching your store, it’s essential to place test orders to verify that the checkout process is operating smoothly. Ensure you test both successful and failed transaction scenarios to confirm that all possible outcomes are managed correctly. This step helps prevent any surprises once your store is live, ensuring a seamless shopping experience for your customers.
✔ ️ Invite Customers to Reactivate Their Accounts: Encourage your previous WooCommerce customers to reactivate their accounts on the new Shopify store by sending them an invitation via email.
Launch and Promote Your Store
✔ ️ Remove Store Password: Go live by removing the password protection on your store, allowing customer access.
✔️ Marketing and Promotion: Develop a marketing plan that includes the use of Shopify Email for email campaigns, setting up discount codes, and customizing abandoned cart emails to increase conversion rates.
✔️ Engage with Customers: Add a chat widget to your store to interact directly with visitors, providing support and driving sales.
✔️ Utilize Shopify’s Analytics:
Use Shopify’s analytics tools to monitor your store’s performance, which will give you valuable insights into customer behavior and sales trends. This data is crucial for making informed business decisions, allowing you to adjust your strategies to better meet the needs of your customers and enhance your business’s success.
Migrating Your Data to Shopify
Migrating your data from WooCommerce to Shopify involves a careful approach to ensure that all important store information is transferred accurately and efficiently. Here’s how you can proceed in the best manner.
Decide on the Data to Migrate
For starters, you need to identify the specific types of data you want to transfer from WooCommerce to Shopify.
This typically includes:
- Product Information: Details like names, descriptions, prices, and images.
- Customer Data: Information such as names, email addresses, and shipping details.
- Order History: Details of past orders which can help in analyzing business trends and customer habits.
- Reviews: Customer reviews that can enhance product credibility on your new site.
Choose Your Migration Method
Selecting the right migration method is crucial for ensuring a smooth transition from WooCommerce to Shopify. To choose the best approach, consider the size and complexity of your store.
For smaller stores with straightforward inventories, a manual migration might be feasible. This involves exporting your data to CSV files and then importing them into Shopify.
For larger stores or those with more complex setups, using a specialized migration tool or service can automate the process, reduce errors, and save time.
Evaluate different tools and services for their reliability, customer support, and compatibility with both platforms. Also, consider enlisting the help of a professional who has experience with ecommerce migrations to guide you through technical challenges and decision-making.
- Manual Copy-Paste: Best for small inventories.
- CSV Import: Suitable for bulk uploads.
- Third-Party Apps: Tools like Matrixify or Cart2Cart automate the migration process.
- Hiring a Migration Expert: Ideal for large stores or those with complex data.
Data Import Process
To import your product data to Shopify:
- Navigate to Products > Import in your Shopify admin area.
- Use the CSV files prepared from your WooCommerce data, ensuring they match Shopify’s required format.
For optional data such as customers, orders, and reviews, similar steps apply but through their respective sections in Shopify.
Using Migration Apps
Apps like Matrixify and Cart2Cart can simplify the migration process:
- Matrixify: Handles bulk data uploads and conversions to Shopify’s format.
- Cart2Cart: Automates the transfer of all store data, including products, orders, and customer information.
✔️ Set Up Source and Target Carts
Configure your current WooCommerce store as the source, and your new Shopify store as the target in the migration tool or app you are using.
✔️ Select Entities to Migrate
Choose the specific data entities (products, customers, orders, etc.) you want to transfer. This selection is typically done within the migration tool.
✔️ Perform the Full Migration
Once you’ve finalized all configurations, proceed with executing the migration process from WooCommerce to Shopify. Carefully monitor the transition in real-time to catch and address any errors promptly
✔️ Post-Migration Adjustments
After migrating, make necessary adjustments:
- Review Imported Data: After migrating, ensure that you thoroughly check for accuracy in product details, customer information, and order histories. This involves verifying that all product descriptions, specifications, and images have been correctly transferred and are displayed appropriately. Similarly, confirm that customer profiles and past order records are intact and reflect the correct data. Accurate migration of this information is crucial for maintaining service quality and customer trust in your new Shopify setup.
- Organize Products into Collections: Grouping products into collections can significantly enhance the shopping experience by making items more accessible and easy to find. This organization leads to a more intuitive and enjoyable customer journey. When customers can effortlessly find what they need, it not only elevates their overall shopping experience but also boosts the chances of them returning and making additional purchases. Such strategic product organization encourages more frequent visits and can positively impact sales.
- Create Redirects: Set up URL redirects from your old WooCommerce product pages to the new Shopify URLs to preserve your SEO rankings. Implementing 301 redirects will help ensure that any existing search engine value is transferred to your new site, maintaining traffic levels and minimizing disruptions in search visibility. This step is crucial for a smooth transition and to help your customers find their favorite products on your new platform without hassle.
✔️ Additional Best Practices
To ensure a comprehensive migration from WooCommerce to Shopify, it’s essential to follow a structured approach that covers all critical aspects:
- Preserve SEO: Maintain meta titles and descriptions to keep search rankings intact.
- Fix Broken Links: Check and correct any broken links post-migration.
- Migrate Blogs and CMS Pages: Transfer all content pages to maintain brand consistency and SEO.
By following these steps, you can effectively migrate your WooCommerce store to Shopify, setting a strong foundation for your new ecommerce platform.
Finalizing the Migration and Going Live
Finalizing the migration from WooCommerce to Shopify and going live involves several crucial steps to ensure everything is set up correctly for a successful launch.
Here’s what you need to do, folks:
✔️ Verify and Organize Products
After the migration, it’s crucial to verify and organize your products. Check each product for accuracy in descriptions, prices, and images. Organize your products into collections to ensure your Shopify store is user-friendly and easy to navigate. By grouping similar items or those that serve similar purposes, you can enhance the shopping experience, making it easier for customers to find what they’re looking for.
This step not only improves customer satisfaction but also helps maintain the structure and aesthetic appeal of your online store, contributing to a more organized and visually appealing layout.
✔️ Place Test Orders
Testing is a key part of going live. Place several test orders to cover different scenarios including various payment methods and shipping options. This helps ensure that all functions of your store are running smoothly and customer transactions can be processed without any issues.
✔️ Disable Unnecessary Notifications
Initially, after migration, consider disabling staff order notifications in Shopify. This prevents your team from being overwhelmed by email notifications for each test order, allowing them to focus on more critical tasks during the go-live phase.
✔️ Follow the Go-Live Checklist
Shopify provides a comprehensive go-live checklist that covers all essentials from setting up payment providers to final checks on your store’s functionality. Following this checklist can significantly reduce the risk of oversight and ensure a seamless transition for your customers.
Covering each step helps to guarantee that all critical aspects of your store’s migration are addressed, minimizing disruptions and maintaining a high level of service throughout the process. This thorough approach enhances customer trust and satisfaction, setting a solid foundation for success in your new platform.
✔️ Set Up Essential Store Features
Configure your shipping and payment methods according to the needs of your business and your customer base. This includes setting up tax rates, shipping zones, and connecting with payment gateways that you intend to use.
✔️ Change DNS and Domain Settings
Switching your domain’s DNS settings to point to your new Shopify store is a critical step. This change makes your new Shopify store accessible to your customers under your existing domain name, maintaining brand continuity and SEO benefits.
✔️SEO and Redirects
To preserve your SEO rankings, it’s essential to set up 301 redirects from your old WooCommerce product pages to the corresponding new pages on Shopify. This step ensures that any existing search engine value is seamlessly transferred to your new URLs, preventing loss of traffic and maintaining your positions in search results.
Implementing these redirects correctly is crucial for a smooth transition and for ensuring that your customers and search engines can find your products easily on your new platform.
✔️ Post-Migration Adjustments
After going live, monitor your store’s performance closely. Check for any data discrepancies in product details or customer information (something an experienced Shopify design agency will do on your behalf). Additionally, review and organize products into collections and fix any broken links or errors spotted during the initial phase.
✔️ Engage and Inform Your Customers
Notify your customers about the new store. This can be done through email marketing, social media announcements, and even through a banner on your new Shopify site. Encourage them to visit and explore the new setup, which can help in smoothing the transition for them as well.
✔️ Monitor and Optimize
Post-launch, keep an eye on the store’s performance through Shopify’s analytics tools. Look for areas to optimize, such as page loading times, checkout process efficiency, and customer navigation ease. Regular monitoring and tweaking can lead to improved performance and increased sales.
Post-Migration Checklist and Tips for Success
After migrating from WooCommerce to Shopify, following a post-migration checklist is crucial to ensure that your new store operates smoothly and efficiently. This checklist should include verifying the accuracy of data transfer, including product information, customer data, and order histories.
What’s more, it’s important to test all functionalities, such as payment processing, shipping configurations, and third-party integrations, to ensure everything is working as expected. Monitoring the store’s performance for any potential issues and making necessary adjustments is also key. This thorough review and fine-tuning process help stabilize the platform and enhance the overall shopping experience for your customers.
Here are some key steps and tips for success:
Review and Audit the Transferred Data
The first step after migrating from WooCommerce to Shopify is to meticulously review and audit all transferred data. This critical step involves verifying the accuracy of product details, customer information, and order histories. It’s essential to ensure that all data has been accurately moved over and is correctly displayed in your new Shopify store. This thorough check helps prevent any discrepancies that could affect customer relations or operational efficiency, setting a solid foundation for your new platform.
- Check Product Information: Confirm that all product details such as names, descriptions, images, and prices are correct.
- Verify Customer Data: Ensure that all customer data, including names, addresses, and contact information, has been accurately imported.
- Examine Order Histories: Look over previous orders to make sure they reflect the correct statuses, amounts, and customer details.
Optimize the Store’s SEO
Maintaining search engine rankings during a platform migration from WooCommerce to Shopify demands careful planning and execution. A fundamental aspect of this process is implementing 301 redirects for all old URLs to their corresponding new Shopify equivalents. This critical step helps preserve link equity and prevents broken links, which are detrimental to SEO. By ensuring that all redirects are properly set up, you can maintain your site’s visibility and ranking in search engine results, thereby minimizing any negative impact from the migration.
What’s more, you should update all internal links within your content to reflect the new URL structure. Consistently monitor Google Search Console for crawl errors and address them promptly. It’s also important to maintain the same URL structure as much as possible, or at least ensure that the new structure is SEO-friendly. Keeping meta titles and descriptions consistent, or enhancing them during migration, can help retain ranking positions.
Along the way, make sure to replicate any structured data (like schema markup) from your WooCommerce site on your new Shopify site to help search engines understand your page content better.
Finally, after going live, continue to monitor traffic patterns and rankings closely for fluctuations, and be prepared to make adjustments to optimize your Shopify store’s SEO performance.
Bear in mind, if you are not an expert at this, make sure you rely on the experience of a seasoned Shopify SEO consultant to help guide you in the right direction to preserve your SEO and future marketing endeavors.
SEO Recap:
- Set Up 301 Redirects: Set up redirects from your old WooCommerce URLs to the new Shopify URLs to keep your link equity intact and avoid any 404 errors.
- Update Metadata: Ensure all pages have the correct meta titles and descriptions to continue ranking well on search engines.
- Monitor Search Engine Indexing: Regularly check how your new Shopify pages are being indexed by search engines and make adjustments as needed.
Enhance User Experience
Ensuring a smooth and enjoyable shopping experience is crucial for retaining customers after migrating to a new platform. This is where you’re also going to want to talk to an experienced Shopify development agency for best standards and practices and optimal conversion rate optimization.
Consider these steps:
- Navigation and Usability Testing: Walk through the customer journey to ensure the site is intuitive and easy to navigate.
- Speed Optimization: Utilize tools to check your site’s loading speeds and make necessary adjustments to optimize performance.
- Mobile Responsiveness: Make sure your Shopify store is fully responsive and delivers an excellent browsing experience on mobile devices. This ensures that all visitors, regardless of the device they use, have a seamless and engaging shopping experience.
Set Up Essential Integrations
Setting up essential integrations in Shopify can greatly boost your store’s functionality, allowing you to expand capabilities and streamline operations. Shopify’s robust platform supports a wide range of integrations with various third-party services and applications that can optimize your operations, improve customer experiences, and increase sales.
To get started, identify the key areas in your business where you need additional functionality—be it email marketing, accounting, customer relationship management (CRM), or shipping logistics.
- Payment Gateways: Connect and test your preferred payment methods to ensure smooth transaction processes.
- Shipping and Fulfillment: Integrate your Shopify store with logistics providers to automate shipping calculations and label printing, streamlining your fulfillment process and enhancing operational efficiency.
- Email Marketing: Set up integrations for email campaigns and automated customer communications.
Conduct Comprehensive Testing
Before you officially launch your new Shopify store, it’s critical to conduct thorough testing to ensure everything functions smoothly. This comprehensive testing should cover several key areas, including checking that all links and navigation work properly, ensuring that payment processes are error-free, verifying that product listings are correct and complete, and testing the site’s responsiveness across different devices and browsers.
What’s more, it’s important to thoroughly test the checkout process to make sure that it is user-friendly and that all payment and shipping options are properly set up and functioning. Running these tests is vital for spotting and fixing any issues before they can affect your customers. Ensuring a smooth checkout experience is key to preventing frustration and ensuring customer satisfaction.
- Functionality Testing: Check all functionalities of your website to ensure they work as intended. This includes testing navigation, search functionality, product filtering, and the checkout process. Make sure all forms, such as sign-up or contact forms, function correctly and that all submitted data is being recorded as expected.
- Payment Gateway Testing: Verify that all your payment gateways are set up correctly and functioning without errors. Process transactions using different payment methods to confirm that payments are received and properly recorded.
- Mobile and Browser Compatibility: Ensure your store looks good and functions well on all major browsers and devices. Many shoppers use mobile devices, so pay particular attention to the mobile experience.
- Loading Speed: Assess the loading times of your site, as slow performance can turn away customers and adversely affect your SEO. Using tools like Google’s PageSpeed Insights is essential in this process, as it can pinpoint specific issues that may be slowing down your site. This tool provides actionable recommendations to optimize your website’s speed, ensuring a better user experience and potentially boosting your search engine rankings.
- Link and Content Review: Go through your site to ensure that all links are directed to the correct pages and that there are no broken links. Also, review all on-site content for errors in spelling, grammar, and formatting.
- SEO and Analytics: Check that SEO elements like meta titles and descriptions are correctly implemented. Ensure that tracking codes for analytics and other marketing tools are properly installed so that you can monitor visitor behavior from day one.
- Security Checks: Confirm that security features, including SSL certificates, are properly implemented to protect sensitive customer data during transactions.
Monitor and Adjust Post-Launch
After your Shopify store goes live, continuous monitoring and adjustments are necessary to ensure optimal performance.
- Monitor Performance Metrics: Utilize Shopify’s analytics capabilities to keep an eye on traffic, sales, and customer interactions.
- Customer Support: Keep an eye on customer inquiries and issues to address them promptly and improve the overall customer experience.
- Continuously refine and Enhance: Do so by implementing changes based on customer feedback and analytics. This iterative process allows you to adapt and improve the shopping experience, ensuring it meets the evolving needs and preferences of your customers.
In following these detailed steps in your post-migration checklist, you can ensure that your transition to Shopify not only meets but exceeds expectations, paving the way for enhanced online success.
Bluesoft Design Can Help!
Looking to make the leap from WooCommerce to Shopify without the headache? Bluesoft Design is your go-to pal for a hiccup-free migration, not to mention we’ll supercharge your SEO and mastermind your paid marketing. Let’s get your store thriving — click your way to success with us today!


